Posing Your Doll

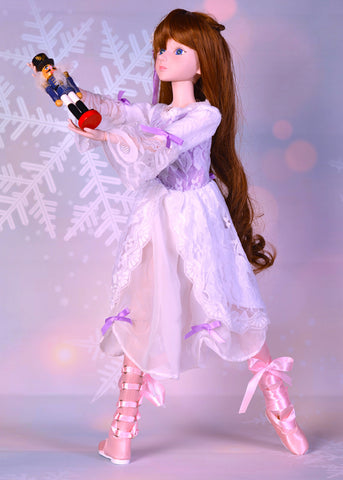
My Ballerina Dolls aren't meant to merely look pretty. They were made to be positioned in and hold classical ballet poses. Just as ballet students must practice to perfect the steps, you have to use a specific technique to pose your doll effectively and easily. While there is no wrong way to play with your doll, we provide some instructions on how best to maneuver MBDs into ballet positions. The example pictures feature the Clara-Marie doll, but these guidelines can be used for all the dolls, whether 21" or 12".
All instructions will be given with the doll starting as taken out of the box, feet parallel and arms at her sides. Some poses may require more aggressive manipulation of the limbs and joints than others. Don't be afraid to be firm with your Ballerina Dolls; they won't break!
These positioning guides are not only helpful to ballet students but to doll collectors, as well. You'll find these poses look very attractive in a display case or for pictures.
Beginning Ballet Class

1st Position Arms
Lift arms to slightly above waist level. Bend elbows and bring hands closer together until the fingers almost touch. Arms should be rounded as if holding a beachball, gently sloping down with bent elbows.
2nd Position Arms
Bring arms to 1st position and then open them to the side. They should still be bent, with upper arms going out to the sides and forearms pointing straight forward. The hands should be pointing slightly inward. Make sure not to bring the arms behind the body!
3rd Position Arms
This one is easy: put one arm in 1st position and the other in 2nd! The one in 1st is the dominant arm and determines the side of the position. For example, keeping the right arm in front of the body makes right 3rd position.
4th Position Arms
Start by bringing both arms to 1st position. Then, leaving the dominant arm (the name of the side) in first, lift the other above the head. Extend the arm as high up as it will go while still remaining slightly bent, hand pointing inward. Note: don't put her hand directly above her head, or it will throw her off balance while dancing! Instead, put the hand slightly in front of her head, so she can glance up and see her fingers.
Intermediate Ballet Class

1st Position Arms & Feet
Position the arms in 1st position, as described above. Turn the feet out so that they are pointing out to the sides. The ideal for 1st position is for the feet to be pointing in complete opposite directions, making a straight line, but not everyone can achieve a 180-degree turnout. Feel free to position your doll's turnout to match your own. Note: you cannot turn the doll's feet out from the ankles or the knees. You must turn them out from the hips. This is an important thing for real dancers to remember, since turning out from any joint besides the hip can cause injury. To manipulate the hip joint, hold the thigh and turn it outward to the desired position. Repeat on the other leg.
2nd Position Arms & Feet
2nd position for the arms is as described above. For the feet, it is merely 1st position with the feet apart. Once you've found 1st, move the feet out to about hips' width apart. Be sure to move the feet out equal distances, so her weight remains in the center.
4th Position Arms & Feet
Bring the arms to 4th position, as described above. To achieve the foot position, start by crossing one foot over the other until its heel touches the instep of the back foot. This is 3rd position, which is rarely used in advanced ballet. Then, move the feet apart so that there is about two inches of distance between them. Be sure to balance the weight equally between both feet. Imagining that your doll is onstage, angle her toward the opposite downstage (toward the audience) corner of the foot which is in front. This is called croisé, and it means crossed in French ballet terminology. Note: whenever possible, it's always better to be croisé in ballet.
5th Position Arms & Feet
For 5th position with the arms, put both arms above the head, as the one arm is in 4th position. For the feet, cross the front foot over as if going to 3rd, but keep moving it until the toe and heel touch. The goal for this position is to have the toe of each foot touching the heel of the other. However, as with all positions, you may adjust the turnout to your desired degree of flexibility.
Advanced Ballet Class

Tendu Croisé Devant
This arm position is called 4th en haut. To achieve it, position the arms in 4th, but bring the lower arm out to 2nd instead of 1st position. The feet also begin in 4th position, angled croisé, as we described before. Then, the front foot is lifted from its flat position and bent at the ankle to point. This is called tendu, which means stretched. You will need to position the doll's weight on the back foot for this pose, since it hurts to put pressure on a pointed toe! The word devant simply means to the front in French. Literally, this pose's name means stretched to the front, crossed over.
Tendu Derriere
You might think derriere is a proper way to refer to the human posterior, but it literally means to the back in French. This ballet move is the opposite of tendu devant, featuring one foot pointed to the back. Instead of making her croisé, point your doll completely toward the side in fourth position, bending her back ankle into a point. Be sure to balance her weight on the front foot. A good arm position for this pose is 1st arabesque. Extend the arm matching the stationary foot straight out to the front and the other arm out to the side, palms down.
1st Arabesque
This pose is exactly the same as the last but with the back leg stretched straight out to the rear at waist level. This position is called arabesque, French for in Arabic fashion. This is one of the most difficult poses for My Ballerina Dolls to achieve, since the back must remain upright even when the leg is extended. To do this, you really must extend the leg straight out to the side when the body is facing toward the audience (en face), rather than to the back. In ballet, this is called à la seconde (to 2nd position). Then, turn the front foot and torso toward the side, which gives the impression that the leg is really to the back. Even the greatest ballerinas have their little tricks! Keep in mind that the waist joint does not bend backward and forward, just side to side. Any torso bending must be done from the upper back, which ensures a proper cambré derriere (bending to the back). Note: in modern ballet, the arabesque is usually expected to be 90 degrees or higher, but poor Clara-Marie and her friends can just manage 90!
1st Arabesque Penché
Penché means tilted in French; it is usually used when referring to an arabesque penché, which is literally a tilted arabesque. That is the move we're describing here. While often more challenging than regular arabesques for real ballerinas, My Ballerina Dolls find penchés delightfully simple! From either tendu derriere or 1st arabesque, simply push the back leg up until it is straight up in the air. You may need to turn the upper thigh a bit to reach a 180-degree "split" penche. The back will naturally go forward in this pose, but that's alright for this position. Leave the front arm in 1st arabesque, but bring the back arm directly behind, putting them in a straight line. Make sure the palm is still facing down. Tilt the head up just slightly, so she isn't staring at the floor but looking into the distance.
Advanced Stretches

À la Seconde Floor Stretch
Like all ballerinas, MBD dolls stretch to obtain and maintain flexibility. The first stretch is on the floor with the legs out to the side, à la seconde. This position is often called side splits, Chinese splits, or splits à la seconde. The goal for this is to have the legs straight out to the side, but, like many ballet students, Clara-Marie hasn't achieved this yet. Just let her stretch as far as she can for now! Meanwhile, put her arms in Russian 2nd position, which is the same pose as regular 2nd but with the elbows turned down and the hands pointed toward the skirt.
Croisé Attitude Floor Stretch
Attitude is the same as arabesque, except that the working leg is bent. This stretch strengthens both attitude devant (to the front) and derriere (to the back). Turn the leg from the hip, bending it until it is flat in front of her. Then, bend the knee so that the lower half of the leg points the other direction at an angle. Do the same with the other leg, bending it to the back. Point the feet, if possible, keeping the body upright. The arms are in 3rd position.
General Notes
In all these poses, try to keep the knees as straight as possible, unless noted otherwise. You can experiment with tilting your doll's head to match each pose. In ballet, the position of the shoulders and head in relation to the hips is called epaulement, which means shouldering.
Your Ballerina Doll may not immediately want to balance in every position. Play with the poses, adjusting the joints and limbs until the weight is properly distributed. There may be a few poses which can only be sustained by leaning your doll against something or holding her up. You can also use a doll stand to sustain difficult positions on display for extended periods of time.